Let's consider popular ways to package an application into a container. We'll write our optimal Dockerfile for Spring Boot.
We live in the era of microservices architecture, and containers have become the primary means of packaging and delivering applications to various environments. However, many developers do not pay enough attention to how to properly package a service, how to do it optimally, and most importantly, how not to leave security holes. In this article, we will explore 4 packaging methods:
- Simple Dockerfile - build and get the image.
- Building with the spring-boot-maven-plugin.
- Using the special Jib plugin from Google.
- Writing an optimized Dockerfile.
For experiments, we will use the following project: github.com/Example-uPagge/spring_boot_docker. This is a Spring Boot application that contains a couple of simple controllers and repositories with an H2 database.
Simple Dockerfile
A typical Dockerfile that developers write looks like this:
FROM openjdk:17.0.2-jdk-slim-buster

ARG JAR_FILE=target/*.jar
COPY ${JAR_FILE} app.jar
ENTRYPOINT ["java","-jar","/app.jar"]
Like a cake, a Docker image consists of a stack of layers. Each represents a change from the previous layer. When we pull a Docker image from the registry, it is pulled layer by layer and cached on the host.
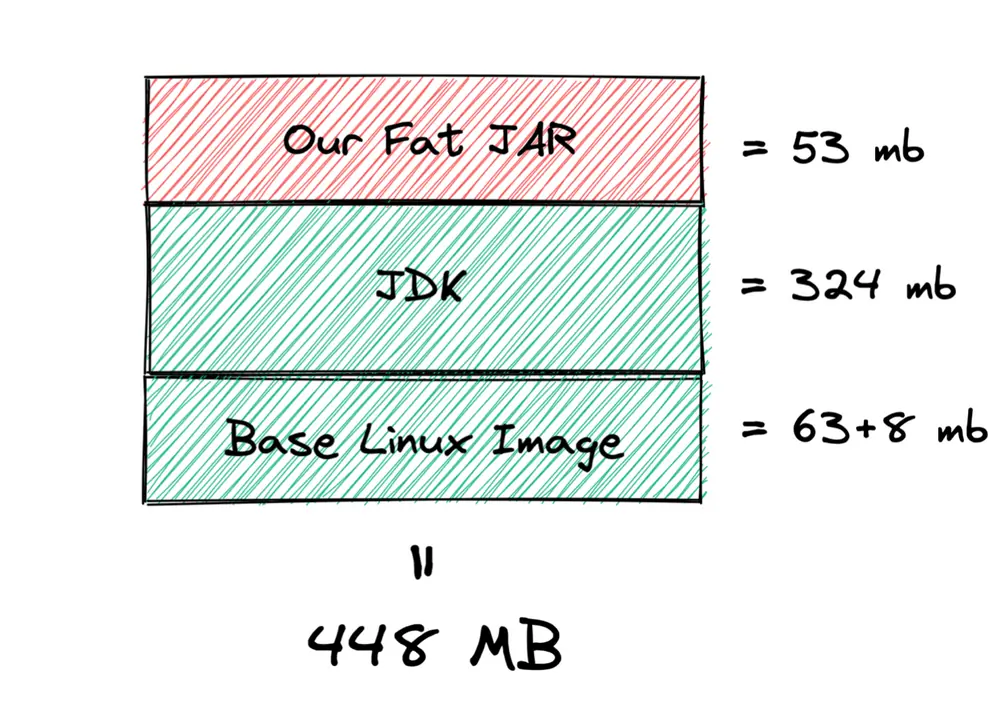
Our typical Docker image consists of a base layer with Linux - the thinner, the better. Then comes the JDK layer. And on top is the application layer, which is effectively just a jar file.
Spring Boot uses the "Fat JAR" packaging format by default. This means that all dependencies required for execution are added to a single JAR file.
But enough theory, let's move on to practice. To obtain the image, first build the application using Maven:
mvn clean package
Then build the image:
docker build -t upagge/spring-boot-docker:dockerfile .
In this case, 'upagge' is your DockerHub login, 'spring-boot-docker' is the image name, and 'dockerfile' is the tag. If you do not plan to push the image to DockerHub, you can specify the name without using the login. For example:
docker build -t spring-boot-docker:0.0.1 .
To analyze the image, use the dive utility. Dive allows you to show differences between layers: which files were added, changed, or removed.
dive upagge/spring-boot-docker:dockerfile
The total size of the image is 448 MB, of which:
- 63+8.4 MB is the Linux layer.
- 324 MB is the JDK size.
- 53 MB is our spring-boot-jar.
Pay attention to the application layer size: 53 megabytes, even though the project contains almost no code. With any code change, we would have to send 53 megabytes over the network and the server would have to download 53 megabytes. The other layers are unlikely to change, so Docker will not transmit them over the network and will use the cache. We'll figure out how to fix this shortly.
To ensure everything works, run the image with the command:
docker run -p 8080:8080 upagge/spring-boot-docker:0.0.1
Open a browser and go to: http://localhost:8080/api/person/1. If the image was started successfully, you will see the word 'valid' in response.
Conclusions on Dockerfile
This is how easily and simply we can package an application. However, this approach has several drawbacks that we will address shortly.
Pros of this approach:
- Full control. You can build your image as you like.
- Fairly simple method.
Cons:
- Full control. You can break something or create a security hole.
- We haven't even started development, and the image is already heavy.
- A large volume of changing layers.
- Runs as root user.


